Pre-installation checklist
Prior to starting the
Microsoft SQL Server and Dynamics GP installation, check your server for
requirements and additional recommendations. To ensure no delays,
verify that you have all the necessary media, service packs, and license
keys that you will need.
You can check for any last-minute updates or known issues added to the Dynamics GP installation documentation on the CustomerSource website: https://mbs.microsoft.com/customersource/documentation/setupguides/gp2010_install (requires access to CustomerSource or PartnerSource).
Check your server
Check your server for the SQL
Server and Dynamics GP prerequisites and requirements, and verify the
recommended server settings for Dynamics GP.
Dynamics GP requirements
Planning: Infrastructure
we went through the requirements and recommendations for Dynamics GP in
great detail. Before you start your installation on any computer,
confirm that the required service packs have been installed and all
other prerequisites are in place.
SQL Server requirements
Depending on your SQL
Server edition and Windows server operating system, some additional
components may be required to install SQL Server. For a full list of
these, refer to the Hardware and Software Requirements for Installing
SQL Server:
Additional recommendations
For the Dynamics GP server where you will be installing SQL Server, the following recommendations can help optimize performance:
Turn off any unused or unnecessary services.
Change
the virtual memory paging file size to one and a half times the RAM on
the server. Microsoft provides documentation about this at the following
URL: http://msdn.microsoft.com/en-us/library/ms187877.aspx.
Set the processor scheduling for background services.
Please note that if you are
not using a dedicated server for Dynamics GP, some of these settings
may cause issues for other existing applications and you may need to
check with your IT resource on this.
Make sure you have all media and license keys
Before starting your
installation, gather all your media, service packs, and license or
registration keys in one place. Some of the downloads can be quite large
and you may want to start them prior to the installation, so that you
are not stalled while waiting for them to finish. Common practice is to
create an installation directory on a file share or the Dynamics GP
server where all the needed installation media will reside. The
following is a typical list of the media and keys you will need:
|
Item
|
Component
|
Notes / Download Links
|
|---|
|
Microsoft SQL Server
|
Media
|
Download or disks.
|
| |
Service Pack
|
SQL Server 2008 downloads: http://msdn.microsoft.com/en-us/sqlserver/bb671149.aspx.
SQL Server 2005 downloads: http://msdn.microsoft.com/en-us/sqlserver/bb671254.aspx.
|
| |
License key
|
This is often part of the media for SQL Server.
|
|
Dynamics GP 2010
|
Media
|
You should have received the Dynamics GP 2010 media or download link
from Microsoft or your Dynamics GP partner. Often there will be a media
download available incorporating the latest service pack, to save you
time during installation.
|
| |
Service Pack
|
Dynamics GP 2010 service packs and hotfixes will be published on the following website: https://mbs.microsoft.com/customersource/downloads/servicepacks/mdgp2010_patchreleases.htm?printpage=false (requires login).
|
| |
License/Registration keys
|
You can get your registration (or license) keys on CustomerSource if you are a Dynamics GP customer: https://mbs.microsoft.com/customersource/ (requires login), or on PartnerSource if you are a partner: https://mbs.microsoft.com/partnersource/
(requires login).
Your Dynamics GP Partner can also help you obtain your registration
keys. These will also include Management Reporter or FRx and Integration
Manager registration keys. Note that you may need to request FRx keys
separately if you only have Management Reporter keys and would like to
use FRx instead.
|
|
Add-ons
|
Media and registration keys
|
If you are installing any Dynamics GP add-ons, gather the media and registration keys for each one.
|
A few things to remember during your installation:
Don't
be afraid to ask questions—it is a lot easier to pause the installation
and get an answer than to have to uninstall and start over.
Make sure your IT resource is available in case you need passwords or access to systems.
Make sure your Dynamics GP resource is available in case you have Dynamics GP-specific questions during the installation.
Installing as the local administrator
Having performed
thousands of various software installations and helped troubleshoot many
others, one critical recommendation is to always install software while
logged into Windows as the local administrator. This is true for server, as well as desktop operating systems.
The local administrator
may sometimes be called or identified differently on various operating
systems, and on some computers the local administrator may have been
renamed; however it will be the account listed as the Built-in account for administering the computer/domain. It is important to note that this is not the same as a user who is in the local administrator's group.
Performing
installations as the local administrator ensures that all necessary
components get installed and registered properly, and helps avoid
various issues in the future. While installing as the local
administrator is typically the norm on servers, this is not often the
case for desktop operating systems. Many system administrators believe
that installing as any local administrator or a domain administrator is
adequate. Often installations are not performed as the local
administrator because the password is not known. Take the time to either
find out or reset the local administrator passwords for all computers
that will be part of your Dynamics GP implementation. The time spent on
this should be minimal and will pay for itself with the first
installation that does not have to be reinstalled.
Installing Microsoft SQL Server for Dynamics GP
The first step in your
installation will be to install Microsoft SQL Server. Installations may
vary slightly, depending on the SQL Server version, what components are
already installed on the server, and what options you choose to install.
Whether the Dynamics GP SQL
Server will reside on a new dedicated server or another existing server,
it is recommended that a new SQL Server instance be installed for
Dynamics GP. This will allow for the settings needed by Dynamics GP to
not interfere with settings that may be different for other applications
using the SQL Server. It will also allow for better control and easier
maintenance. With a separate SQL Server instance if the SQL Server
services need to be restarted for Dynamics GP, other applications on the
server will not be affected.
Installation steps
The following are steps for a typical installation of SQL Server 2008 on Windows Server 2008.
1. Start the Microsoft SQL Server installation by running setup.exe, or having the autorun start when you insert the SQL Server installation disk into the server.
2.
If the installation detects that you are missing any prerequisites, you
will see a notification asking you to install them. Depending on what
prerequisites are missing, the message may differ. An example is as
follows:
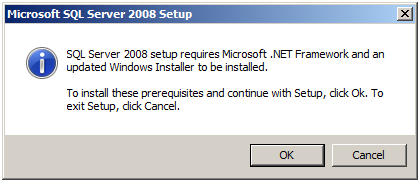
3. Click OK
to install the prerequisites. A server restart will typically be
required after this step. After the restart, start the installation
again if it does not continue automatically.
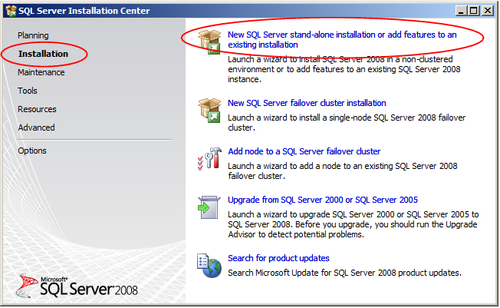
4. On the SQL Server Installation Center window choose Installation on the left-hand side, then choose New SQL Server stand-alone installation or add features to an existing installation:
5. The Setup Support Rules
window will open with details on any issues that SQL Server may
encounter during installation. You can see additional details by
clicking the Show details button. Clicking the Status hyperlinks will give more details for each rule. Once all the rules show a status of Passed, you can continue the installation by clicking OK.
6. Enter your SQL Server Product Key on the Product Key window and click Next.
7. On the License Terms window, read the license terms and if you agree click the I accept these license terms checkbox, then click Next.
8. On the Setup Support Files window click Install.
9. The Setup Support Rules window will open again showing any issues that were encountered, click Show details if you would like to see details and click the Status hyperlink to see details for any of the rules. The following is an example of the warning for the Windows Firewall rule:
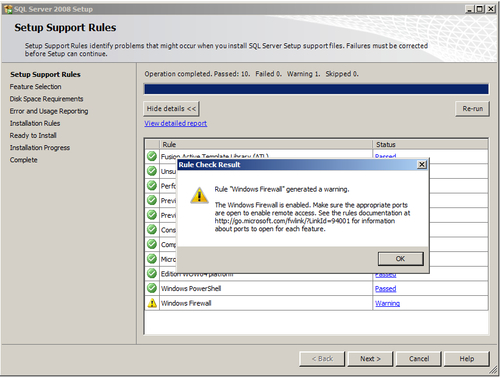
Click Next to continue your installation.
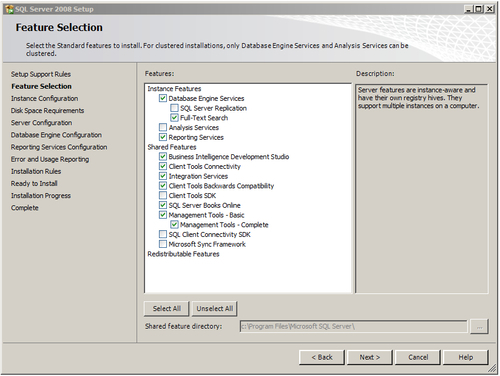
10. On the Feature Selection window choose the components you would like to install. The minimum components required for Dynamics GP are Database Engine Services and Client Tools Connectivity. Management Tools, while not required, are also recommended. Whether you have the option for Basic or Complete will depend on the SQL Server version you are installing. If you have the Complete option, that is recommended.
If you are not going to
be using SQL Server Reporting Services or Analysis Services, do not
install them, they can be added later if needed. However, if you think
they will be needed down the line, it may be simpler to install them
now. To get more details about all the features available, click Help or
refer to this URL: http://technet.microsoft.com/en-us/library/ms143786.aspx. The following is a typical feature selection:
For SQL Server 2005
installations, the feature selection window offers slightly different
choices and the components required for Dynamics GP are SQL Server
Database Services and Workstation Components. Click Next to continue.
11. On the Instance Configuration window, select Named instance:
and choose a name for your SQL Server instance. Even if there is no
default SQL Server instance on this computer, it is recommended to use a
named instance, not the default one, and to call it something simple,
such as GP. This will help quickly and
easily identify the Dynamics GP SQL Server in the future, when
connecting to it from other computers on the network or looking through a
long list of SQL Server instances.
While it may be
tempting to use the Dynamics GP version number in the instance name,
consider that you may upgrade Dynamics GP versions and stay on the same
SQL Server version and instance. Renaming the SQL Server instance is not
a simple endeavor, so it may be best to keep the version number out of
the name.
Changing
the Named instance on this screen will automatically fill in the same
for the Instance ID. It is recommended to leave this and not rename the
Instance ID. SQL Server instance names:
On this window
you can also change the installation path for SQL Server if you do not
want it installed in the default location. The following screenshot
shows a typical selection for the Instance Configuration window:
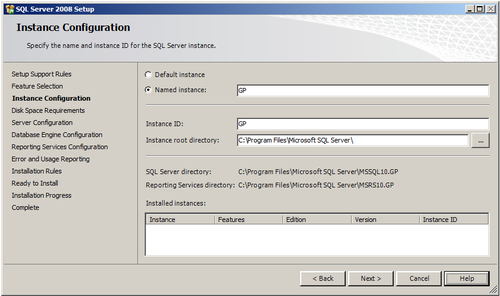
Click Next to continue your installation.
12. The Disk Space Requirements window will show you the required and available space for your installation. Make sure there is plenty of space and click Next to continue.
13. On the Server Configuration
window you can specify the startup type for each SQL Server service,
the accounts to use for these services, and the SQL Server Collation.
To
simplify administration, it is recommended to set all the services on
the Service Accounts tab to start automatically and to use the SYSTEM
account. This will prevent issues caused by changing passwords for
accounts in the future. You can click the Use the same account for all SQL Server services button to set this easily.
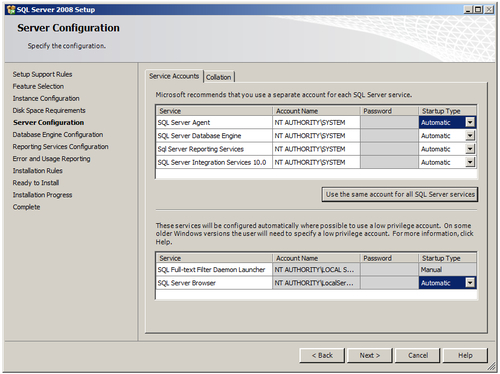
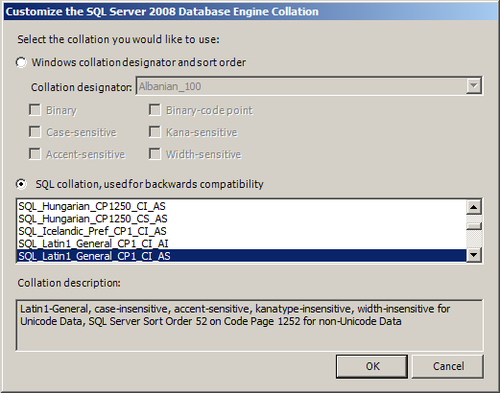
Switch to the Collation tab to
verify the collation settings for your SQL Server. For US installations
of Dynamics GP, use collations with a code page of 1252. Dynamics GP
only supports the following two sort orders:
a. DOCI (dictionary order, case-insensitive) - sort order 52
b. Binary - sort order 50
The corresponding collation choices for these with a US installation are:
a. DOCI: SQL_Latin1_General_CP1_CI_AS
b. Binary: Latin1_General
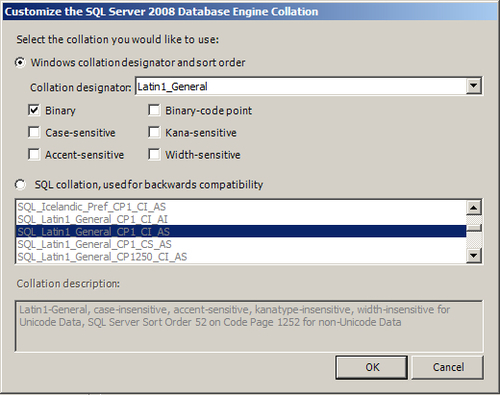
For
most Dynamics GP installations it is highly recommended to use the DOCI
sort order. This will provide a more consistent user experience, as most
applications in use today do not perform case sensitive sorting. It
will also allow for greater integration and extension options, as
various modules and third-party products you may decide to implement in
the future may not be compatible with a binary sort order.
During
your SQL Server installation, the collation will typically default to
SQL_Latin1_General_CP1_CI_AS, however, it is important to verify this.
Click Next to continue.
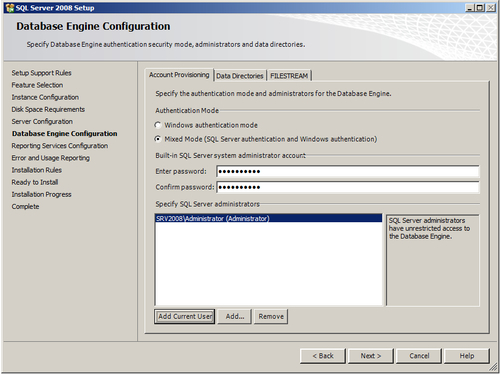
14. On the Database Engine Configuration window make sure to change the setting on the Account Provisioning tab to Mixed Mode.
Dynamics GP requires SQL Server authentication, so this is not
optional. Enter and confirm a password for the SQL system administrator
(sa) account. Prior versions of SQL Server may allow a blank sa password, however, this is not recommended for security reasons.
If desired, you can use the
buttons at the bottom of the window to add Windows users or groups as
SQL Server administrators. This is optional and can also be done at a
later time. The following screenshot shows an example of having added
the local administrator on the server using the Add Current User button:
15. If you would like to change the default locations for the SQL Server databases or backups, click on the Data Directories tab to set these. Click Next to continue.
16. If you selected Reporting Services during the Feature Selection, the Reporting Services Configuration window will come up. If you are not sure which configuration mode you will need, you can choose the third option to Install, but do not configure the report server. Otherwise, select a configuration mode and click Next to continue.
17. On the Error and Usage Reporting window decide if you would like to automatically send any data to Microsoft and click Next to continue.
18.
Another test will be performed to verify that no installation processes
will be blocked. You can view details and more information on the Installation Rules Next to continue if there are no failures showing. window. Click
19. The Ready to Install
window will list all of the settings you have chosen so that you can
confirm everything is correct. If you need to change anything, use the Back button, otherwise click Install.
20. Once the installation is completed, the Installation Progress window will show all the components that have been installed. Click Next to continue.
21. The Complete window will give you additional information about your installation and show you the location of the installation log file.
After the installation of
SQL Server, it is recommended to install the latest service pack, as
long as that service pack is supported for Dynamics GP. For the latest
updates on compatibility, check the Microsoft System Requirements for Dynamics GP 2010 web page: https://mbs.microsoft.com/customersource/documentation/systemrequirements/MDGP2010_System_Requirements (requires access to either PartnerSource or CustomerSource). A list of SQL Server build numbers and what service packs they correspond to is available at the following URL: http://victoriayudin.com/2008/10/05/what-version-of-sql-server-am-i-running/.
For SQL Server 2008 and
2005, the version will be shown next to the SQL Server instance name in
the Object Explorer of SQL Server Management Studio. You can also
execute the following query in SQL Server Management Studio to get the
version number and edition of SQL Server installed:
select @@version